Ever wondered what to do with those beads you just bought? I totally understand! This was me when I first saw mushroom button beads! They looked so interesting and attractive, but what could I possibly make with them?
It took me some time to find an easy way to create a simple yet very interesting pair of earrings using these beads. As it usually happens in my craft room, Ripple beads accidentally placed right near my newly purchased mushroom beads solved the mystery. I decided to combine them in a pair of modern long earrings.
Before you start
These earrings are easy and fun to do. However, there are two important factors you shouldn’t miss making them.
1. You have to use thread. Metal components won’t let these beads form the wavy structure.
2. You have to focus on secure connections described in these instructions. Making shortcuts and not securing the ends of the thread may result in broken earrings. If you are planning to sell them, you would want your customers be happy for more than an hour wearing them.
You will need:
Mushroom button beads – 8
Ripple beads 12 x 3 mm- 10
O beads – 10
#15 seed beads -2
#8 seed beads – 4
Ear wires – 2
Two 5 mm rings and pliers.
About a yard of thread and a beading needle. I used 4 lb Fireline.
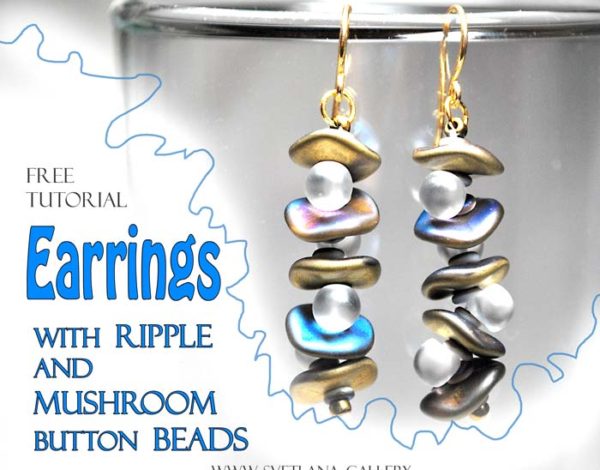
Long Earrings With Ripple And Mushroom Button Beads Tutorial
Place a stop bead on a half a yard Fireline thread (4 lb is preferable) or nylon thread.
String an “O” bead, a Ripple bead, an “O” bead, and a mushroom bead.

Repeat four more times. Ripple beads have two sides. Note how earring changes its color depending on an angle. You may arrange all ripple beads just so one color faces up and other – down. Or you may choose to string it randomly.

String another “O” bead, a #8 seed bead and a #15 seed bead. Pass back through the #8 seed bead and all the beads you have strung from the beginning.

Remove a stop bead.
Tie a surgeon’s knot using both ends of the thread.
Insert the short end of the thread into the #8 bead, pass through the same bead with your needle and the other end of the thread.

Pass through the whole earring again and return back stopping right above the first mushroom bead.
Thread the needle with the shorter end of the thread. Pass through the bead to meet the other end of the thread. Tie a surgeon’s knot.

Using the longer thread, pass through the beads towards to the top of the earring and tie a knot around the #8 seed bead. Pass through several beads and cut off the thread.

Using pliers open a ring and connect the top #8 seed bead and the ear wire with it.

As you see, the structure of the earring is pretty simple. However, don’t underestimate the powers of knots. As I mentioned above, failing to secure both ends of the thread will result in a poorly constructed earring which will fall apart eventually.

Learn more about using knots in bead-weaving here.
Happy beading!