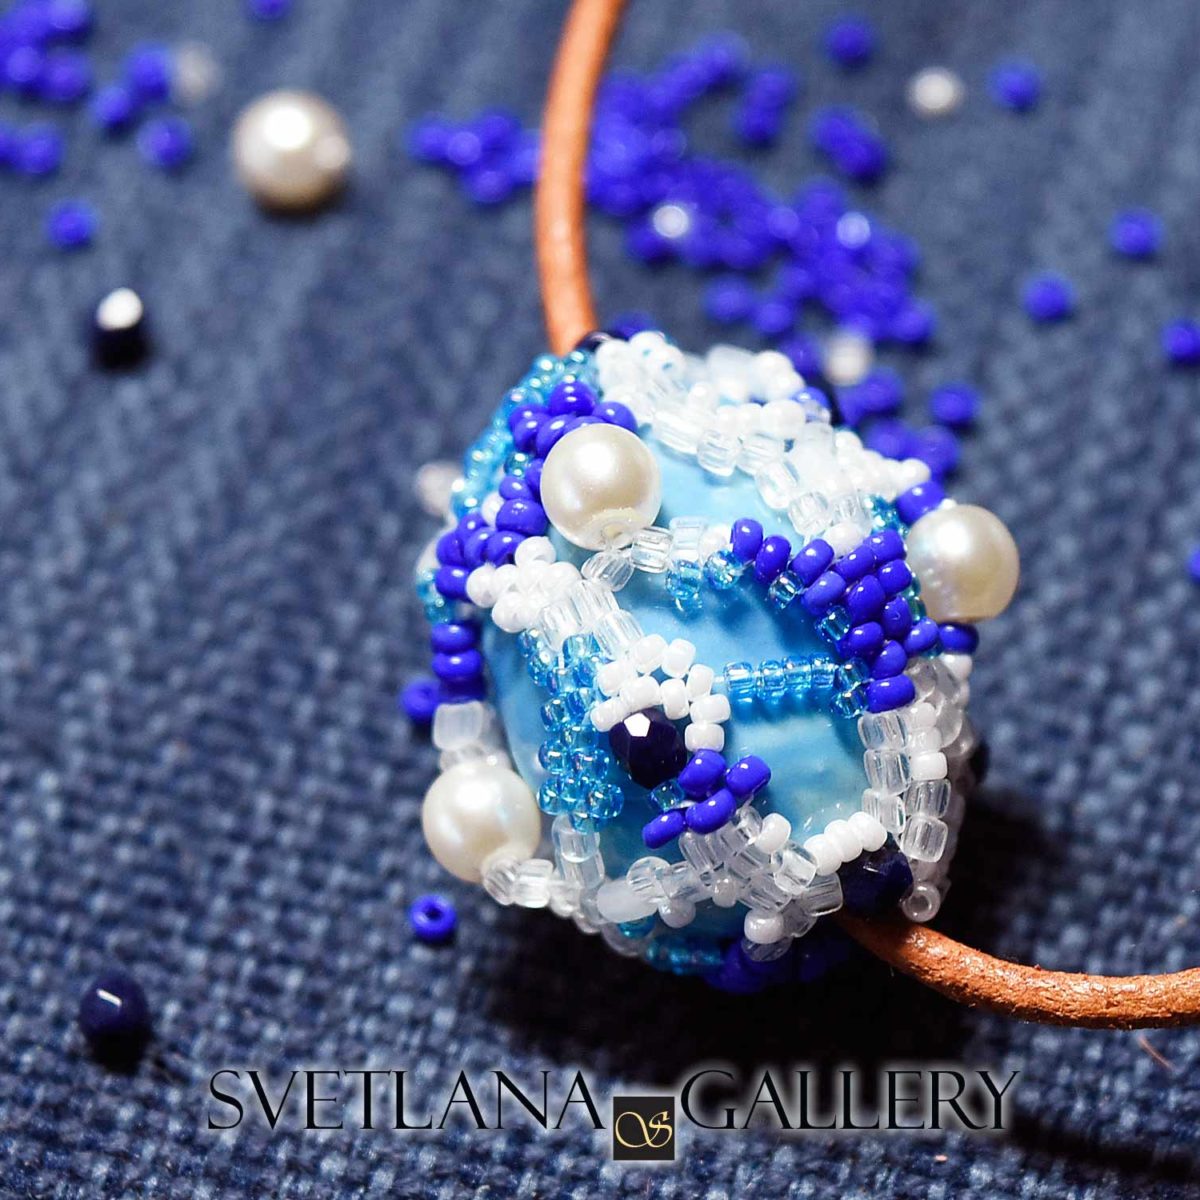
Wrapping a ceramic bead using a free-form peyote stitch technique was a fun beading project.
There were times when I couldn’t find a free-form peyote stitch technique description online. Now I understand, it is hard to give particular instructions on how to bead using this technique because it is a free-form technique.
Recently I had an idea of wrapping a bead with such beadwork. So I decided to record the process for everybody interested in free-form beading. I couldn’t include all the steps because it would be a very, very long video. Instead, I tried to demonstrate the thought process behind the beading giving you just samples of beadwork decisions I had to make.
Wrapping Ceramic Bead Using Free-Form Peyote Stitch Technique
Beads
You may choose any ceramic bead you like. Or, you may select other large beads of the size you prefer.
The ceramic bead I chose for this project is 25 X 20 mm. It is available in my Etsy shop.
Seed beads for free-form are relatively easy to choose. You don’t need too many, and there are no strict requirements. It is fun to use leftovers for such projects, especially when deciding to work on a single bead.
I used some vintage seed beads. Some of them were not uniform. However, they are ok to use for the free-form technique because I make decisions regarding every single bead as I go.
As accent beads, I used 3 mm firepolish beads and 6 mm glass pearls.
The Creative Process
I started with a flat peyote stitch using several kinds of seed beads. You can use even-count or odd-count peyote, it doesn’t matter, because you need to make three-four rows of it. Everything more than three rows will look too organized and won’t support the free-form concept.
If you need to learn flat peyote stitch basics, check out my easy to follow tutorial.
Then I decided to attach this element to the ceramic bead. I used 3 mm firepolish bead as a stopper before I passed the hole of the ceramic bead. I also added one after I went through the ceramic bead. The diameter of the hole was 2.5 mm, so I needed anything bigger than that.
There are no rules on when you have to attach the beginning of your beadwork to the ceramic beads. I felt it is better to do early than late. By “late,” I mean the stage when you built some beaded fabric, but it might not wrap around the bead smoothly.
Despite the stop bead I placed before I started making a peyote element, it still was not fixated enough after I attached it to the ceramic bead. I knew it would change once I add more beads.
When adding beads, you don’t have to use the peyote technique every time. You probably noticed watching the video, that sometimes I strung 7-9 seed beads that would create a bypass. It is one of the basic principals of the free-form technique.
If you have any questions regarding this video demonstration or the technique, please, feel free to comment under the video or here.

Ceramic Bead Covered with Free-form Beadwork 
Ceramic Bead Covered with Free-form Beadwork 
Ceramic Bead Covered with Free-form Beadwork


Free-form Peyote Technique Benefits
The free-form peyote technique is my favorite way to express myself by beading and enjoying the process. When I bead, I don’t know what bead I am going to pick up next. And that makes it very adventurous for me.
If you are not familiar with this technique, I suggest you start with a small item like a ring or ceramic bead. And then go with the flow.
Expressing yourself through the beadwork makes this process very therapeutic.

Happy Beading!