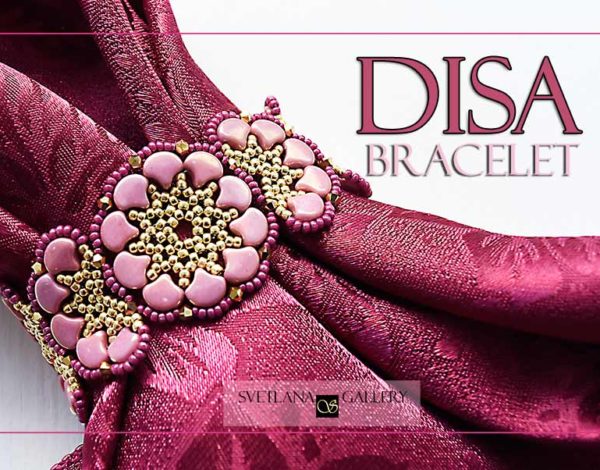
Who loves the Right Angle Weave stitch? The new Disa beaded bracelet tutorial is for everyone who cannot resist another RAW beading pattern. But there is more to Disa design than just a pattern to relax with.
Beads
The new Ginko beads captured my mind. I am sure this happened to any beading enthusiast before.
Ginko beads have been on the market for a while, but seeing them online is not enough for me to feel them. Let me explain what it means.
Despite beads’ tiny size, they seem to be more like furniture in the house to me. It is hard to imagine the new shape of a bead in your beadwork until you actually try to beading with it. The twists and turns of the thread, the other familiar beads rubbing the new ones, the finish, and the colors – all make a lot more sense when you lay it down on your beading mat.
Just like with Crescent beads, Ginko had to be on my mat to play with before I came up with the design idea. By the way, beadwork designs with Crescent beads demanded much more testing than Ginko, in my opinion.
There are just three more types of beads needed for the tutorial: seed beads size 11 and 15, and Firepolished beads.
Bracelet Idea
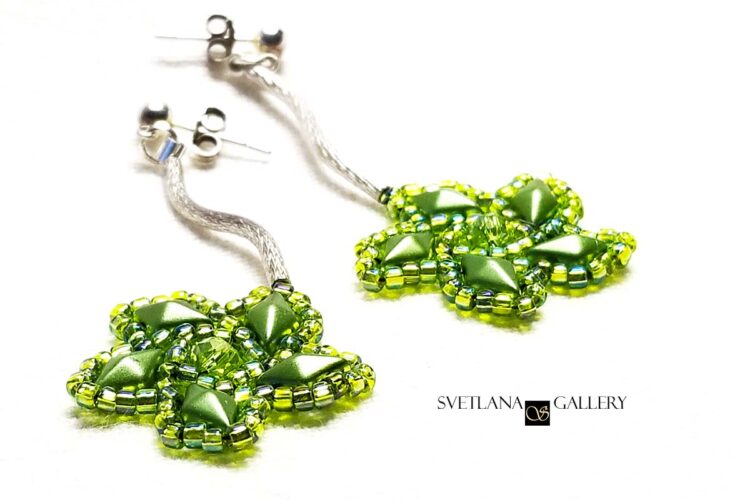
The bracelet idea was born after I made two pairs of earrings.
Yes, I wanted to make earrings. And I made exactly what I wanted. However, when I finished beading, I thought, my beaded elements had to become something more than just a pair of earrings.
Why?
Because when there are earrings, I have to have a pendant. When there is a pendant, I have to have a bracelet. Sounds familiar?
So, why not have everything in one?
Disa – Beaded Bracelet Design With Ginko Beads
Disa beaded bracelet design with Ginko beads is for everyone who likes the Right Angle Weave technique and has some beginner skills using it.
The bracelet consists of elements that can be used to make pendants and earrings.
For the pendant, it is better to weave only the center part of the bracelet.
For the earrings, you might like to use the Half-circle element as a base of the design.

Beading Tips and Problem Solutions
Seed Beads
As you probably already know, not all seed beads created equal. Sometimes, combining seed beads made by different manufacturers in one beadwork project is a problem. I designed Disa to avoid this problem.
As long as you choose one seed bead manufacturer for the whole bracelet project, you won’t have any problems.
But what if you want to experiment and use two colors of seed beads, and they are made by a different manufacturer? I will explain it in a separate section. Please, see below.
Clasp
I like to use slide-in clasps for my wide bracelets. But you don’t have to. Disa bracelet has bold design features in the form of Ginko beads. Why not use a toggle clasp with distinctive elements that complement the bracelet?
Also, the clasp size might solve the problem of the bracelet size. To make the bracelet fit perfectly, you can either add or remove one or more Half-circle elements or replace some of them with a well-designed toggle clasp.
Colors
Disa bracelet design features Ginko beads. You might like to choose colors starting from your featuring beads, and then match other beads accordingly.
The bold contrast between Ginko beads and seed beads might be one of the colorway ideas.
Select one color for all the beads, and Disa will look totally different, but not less attractive.
But how about a crazy combination of different colors for all Ginko beads in the bracelet? This way, you can weave a bracelet using leftover Ginko bead from another project. Would you try something like that?
Gold and Rose Disa Colorway
Everyone who feels comfortable with RAW stitch, I encourage experimenting with more colors of seed beads.
In my version of Disa with gold and rose colors, I wanted to add an accent to the border of each element, so I used two colors of seed beads. Gold for the inside of the element and dark rose for the outline. That meant I had to use the second color of the seed beads for specific steps of the tutorial.
For everyone who bought the tutorial, these steps are:
- Step 7 c
- Step 16 a
- Step 17 a
That’s it!

Seed Bead Manufacturer Differences
I had one problem, though.
The seed beads I chose for my colorway was made by different manufacturers.
Using them slightly changed the distances between beads. Therefore, when I got to Step 12 and 16, I needed a solution to make it look perfect – to fill the space with enough beads.
My solution was seed beads size 15.
For everyone who bought the tutorial, you can change Step 12a and Step 16a to “String 1D, 1C, 1D” if your beads for the outline color are two narrow and smaller than the beads for the inside color.
Bicones
Another change I made in this version of the bracelet was bicones instead of Firepolish beads. I wanted to add more sparkle to this bracelet, and it worked.
I continue working on more bead ideas on how to use Disa design for other beading projects. Do you have any ideas about how to change Disa colors? Any suggestions for bead substitutions? Please, share them in the comments below.
Happy beading!