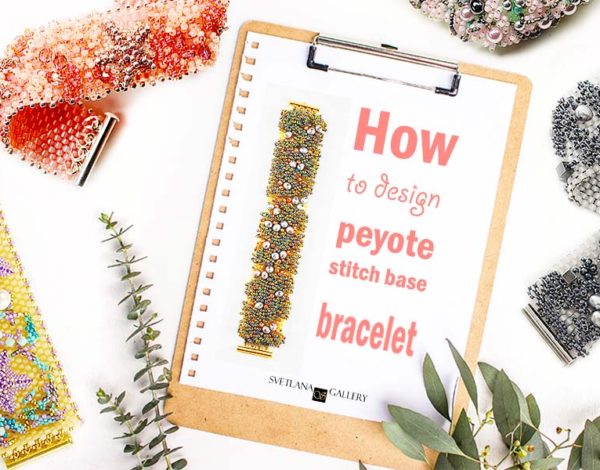
Peyote stitch base bracelet is one of the best ways to explore your creativity while practicing the stitch. It is totally up to you to choose more comfortable or more challenging routes to implement your idea. The bracelet will be unique no matter what level of peyote technique make you fill comfortable.

It is the best beading project to use your stash without ordering additional supplies. Searching for a particular bead color or components usually grows into a massive shopping experience which gets in the way of creativity. Try to use what you have on hand and see what happens.
I designed and sold many of these bracelets, and every time it is a fun, beading adventure. If you are adventurous, let’s get started.

Choose Colors
I get inspired by natural color combinations as well as fashion designs. Sometimes, I just happen to have several tubes of different beads on the table, and they seem to look good together. This is how the idea is born.
There are many colorways I would suggest, but in the end, you will be limited by your stash.

Select contrast colors for the base and the free-form embellishments. If you choose to use many accent beads, choose either much darker or much lighter color against the other two colors of the base and decorations.
Another way is to use lighter and darker tones of the same color for the base and embellishments and choose a different color of accent beads.
Embellishments can be of the same color, or a combination of colors.
If you need help practicing color combinations, check out the following articles I wrote earlier:
5 Steps to Create Better Color Palette
How to Use Color Cards for Beadwork Design
Choose Beads
You will need the following seed beads:
- Round seed beads size 8 for the base
- Round and cylinder seed beads size 11 for embellishments
- Round beads of different sizes – 5 mm, 8 mm
- Fire-polished beads
Use larger beads as accent beads. Preferably round beads, such as glass pearls, faceted crystals, firepolished beads.
Findings
The clasp is a necessity. I prefer the large tube clasps, but you might consider other types. If your bracelet is not as wide as mine, you may use a toggle clasp instead.
Focal Beads and Beaded Elements

Beaded elements is a great way to show off your creativity and beading skills.
I designed a couple of bracelets with beaded elements so far. Both are made with beaded Starfish.
I see the possibility of making a bracelet with bezeled Swarovski Rivoli crystals as focal points. I am sure many of you would like this idea!
I also consider using a bead embroidered focal point such as one I designed for Snow Maiden necklace.
Techniques

Peyote stitch is a must-to-know technique for this project.
I hope you feel comfortable weaving using flat even-count peyote stitch. It is at least one technique that will help you complete this bracelet once you design it.
If you choose to add other beaded elements such as bezeled rivoli, or any kind of free-form feature you might want to master peyote stitch a little more, or even learn a new beading stitch.
Draw the Design
I created my first couple of bracelets without drawing anything. I just continued weaving adding accent beads as I go.
However, when the design became slightly complicated, I noticed that I lose track of all the elements while I focus on stitches.

I needed a constant visual reminder of my design. This way, I could repeatedly compare the drawing with the actual bracelet structure and check if I have missed anything.
Sketching a bracelet design is not difficult. Use primitive forms and lines to mark your design idea. I described how I did this in detail in this beading tip post.
Measure and Make a Base

Before you start weaving the base, you have to measure your wrist. Use a flexible measure tape for sewing, and don’t forget to loosen it up a bit. The bracelet won’t be as flat as the tape, so you need to give it some room for dimensional design.
Also, decide how wide your bracelet is going to be. It depends on your beaded elements if you want to use them in the design. If you choose to use only accent beads, go with the width that feels comfortable for you. Most of my bracelets I started with 12 seed beads (which, of course, form first two rows, see the Peyote stitch tutorial)
When you about to finish your base, measure it against your wrist one more time, to make sure it is the size you need. Also, consider the size of the clasp, you are going to add later.
Attach Focals and Beaded Elements

When you finish your base, make another sketch of the design. The sketch should be the same exact size as your base. This way, you will be able to keep track of all the elements while you bead. If you are using focals or beaded elements, such as Starfish, mark them on the sketch first.
Start decorating the bracelet with your focals, or beaded elements. Check this article for more instructions.
Free-form Beaded Embellishments

The last, but not least part of the work is adding free-form embellishment beadwork to the base. This is the fun part of the project. You are free to experiment.
Having the sketch in front of you, you can start adding seed beads size 11 the way I did it for my Peyote Bracelet Variation, or use free-form peyote, just like I did for my Starfish bracelet.

Attach the Clasp
I recommend threading a needle with a separate piece of thread (about 1 yard).
Why? If something happens to the thread that connects the bracelet and the clasp, you will be able to replace the thread and attach the clasp again.
If something happens to the thread that holds the bracelet together, you might lose pieces of the bracelet, and it will be much harder to replace them and reconstruct the design.
Secure the end of the thread weaving it back and forth several times in different directions. Then weave through the clasp.

Then you will still have enough thread to weave through the bracelet structure and exit on the other end, to attach the second part of the clasp. This is how I do it. You might choose to use two separate pieces of thread to attach both parts of the clasp. It is up to you.
Edge Decorations
To decorate the edge, or not to decorate? I think it depends on the design.
If your bracelet is going to be heavily embellished with “loops” covering the edges of the bracelet in some places, it is probably ok to leave it be and enjoy the contrast between bare base and decor.
Otherwise, you may try the picot stitch technique and finish the edges.
There are many other choices and design ideas you might find suitable for this bracelet. Why not experiment? I am sure you will create the design which will be much better than you expected.

Happy beading!